Sunday, June 17, 2012
Day 5: tiny
Elle's tiny little teeth, so cute! Now they are fully in and she is getting her top two teeth. She is growing up so fast!!
Friday, June 15, 2012
Day 4: Someone who makes you happy
Just someone?!? It can't be someones? Because there are lots of people who make me happy, :)
Well I guess if it just has to be someone, I'll choose.........................................................
Well I guess if it just has to be someone, I'll choose.........................................................
Justin
Thursday, April 5, 2012
Day 3: Mail
Mail? The only time I like getting mail is if it's a package, but other wise mail is boring!! or bills yuck, haha
I'll have to say the other two days I had loads of photo ideas for but this one.....umm no so much. But then we got a box delivered to our door
I'll have to say the other two days I had loads of photo ideas for but this one.....umm no so much. But then we got a box delivered to our door
Haha, she actually didn't come in the box a present for Justin did but she is way cuter!
Day 2: Colour
When I see the word "colour" mind automatically thinks of makeup, lipstick in particular. But since I don't have lipstick commerical lips I decided to go with my eyes. Here's what I came up with for colour :
I think maybe I need to get my eyebrows waxed...
First photo: My reflection
Everytime I look at my daughter I see myself or atleast my baby self.
Here is a picture of me at that age:
Here is a picture of me at that age:
Sunday, April 1, 2012
Photo a day
I'm so happy it's spring!! Well actually it's felt more like summer here the last couple days, I love it. Maybe for once it will be nice on Easter, usually it's so cold and I'm always freezing my butt off in my cute little sun dress. Any who since I have been doing my "spring cleaning" since January I need to do something different just to shake things up a bit. So I've decided to do this:
Get ready to see some awesome pictures all this month, yay!
Tuesday, March 6, 2012
Jewelry Frame
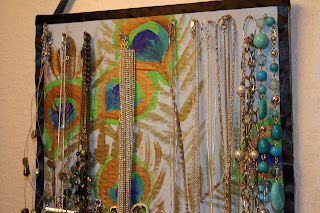
Yesterday's "Declutter to do" was sort through jewelry, so after I did that I decided to make a pretty way to keep my jewelry organized. Here's what I came up with:
But it seems that I still have too much jewelry, I guess I need to make a bigger frame ;) But isn't it great, not only do I now have a piece of art but I can keep my necklaces from getting tangled in a drawer and I can always see what I have so I don't end up with duplicates.
Instructions for making your own jewelry frame:
-First decided what you want to hang your jewelry on, options include: cork board, canvas, plywood, the wall or a piece of card board like I have used here.
-Next you can decorate it, I painted mine but you can cover it with fabric or leave it bare too.
-The next step depends on what you used for your base, since I used cardboard I was able to use small carpet tacks to hang my necklaces on. But if you use a cork board you can just use thumb tacks. If you paint directly on to the wall I'd use nails, but I suppose tacks would work as well. They also sell little hooks that screw into the wall that you could use. It just depends if you care about holes in your wall, my husband doesn't like when I put hundreds of holes in the wall, plus we don't plan on living here forever and the next owner may not like peacock feathers painted on the wall.
-So after you put in your tacks or nails you can hang your jewelry and ta dah you have a pretty way to display your jewelry.
Subscribe to:
Posts (Atom)


